Rope work & Climbing
Squadron Leader Frank Smythe was an accomplished mountaineer and along with John Hunt, who later led the successful 1953 Everest ascent, instructed the recruits in winter survival and mountaineering
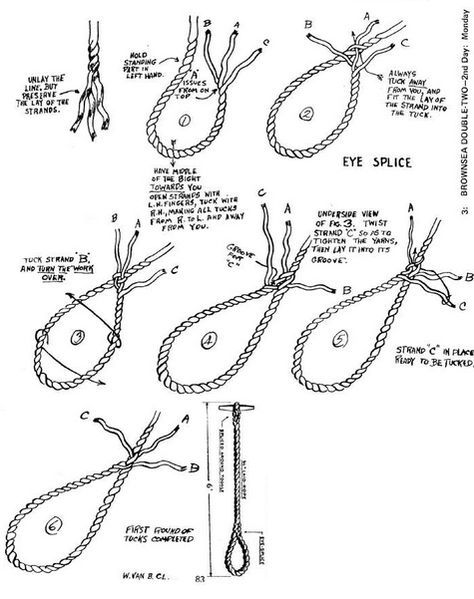
Rope work
The toggle rope was part of the standard equipment of British Commandos during World War II. It was 6 feet long, and had a wooden toggle at one end held captive in a tightly fitting eye splice, with a larger eye at the other end. This enabled them to be fastened together to create a rope ladder, or to secure around a bundle for hauling, among other uses as well as an ad-hoc truncheon. The ropes were carried around the Commandos waists while not in use.
Climbing
Confidence in climbing and tyeing knots was an essential requisite as Commandos were needed to be able to scale and rappel down cliffs, harbour walls and coastal defences amongst other natural and mand-made obstacles in any conditions and whilst being potentially under fire.
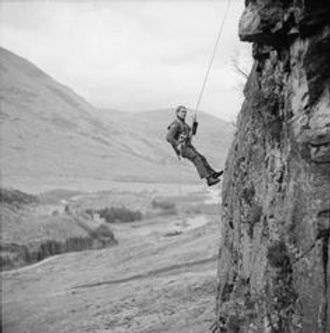

Rappelling - descending using ropes
During World War II, commandos and other special forces units used a variety of techniques to rappel down cliffs, depending on the terrain, mission, and equipment available. On the St. Nazaire Raid (1942): British commandos attacked German-held docks in France, often climbing or rappelling in harbor areas; And while sabotaging the Norwegian Heavy Water facility (1943), Commandos traversed and descended mountainous terrain in winter.
-
Norwegian Heavy Water Sabotage (1943): Norwegian commandos traversed and descended mountainous terrain in winter.
Here's how they typically did it:
Basic Equipment Used
-
Ropes: Natural fiber ropes (usually hemp or manila) were used; these were strong but bulky and prone to wear.
-
Harnesses: Early commandos often used makeshift harnesses or simple rope slings (like the Swiss seat) tied around the waist and legs.
-
Carabiners: Metal carabiners or snap links were sometimes used, though they were not as standardized or common as in modern climbing.
-
Anchors: Anchors were usually improvised—trees, rocks, or driven pitons (metal spikes) served as anchor points.
Techniques
-
Classical (Body) Rappel / Dülfer Sit:
-
Used in emergencies or when equipment was limited.
-
The rope was wrapped around the body (over shoulder, under opposite leg) to create friction for descent.
-
This method could cause rope burns and wasn’t comfortable but worked without harnesses.
-
-
Australian Rappel (Face-Down):
-
Originated with Australian commandos.
-
The person descended facing the cliff—used for quick assaults or to keep weapons ready.
-
Provided a psychological advantage but required more control.
-
-
Standard (Back-Down) Rappel:
-
The more common method: descending back-first using belay friction, often with a makeshift harness or waist belay.
-
Training and Execution
-
Commandos trained extensively in Scotland, Norway, and other rugged environments.
-
They practiced cliff assaults, beach landings, and infiltration techniques involving rappelling.
-
Speed, stealth, and teamwork were critical—they often rappelled in darkness or under enemy observation.
Swiss harness
A common technique used was the Swiss harness because it was simple, secure and only required rope.
Steps
1
Find the center of the rope by folding it in half and going to the fold. Place the fold in the center of your lower back, ends out to either side of your body so that you're holding an equal length in each hand.
2
Cross the halves in front of you so that it wraps around your waist. Pull one side under the other to make a half hitch. Repeat so that the rope turns twice around itself. This will eventually be where the carabiner is placed and it keeps the rope from pinching down on your testicles (if you have them). Drop both of the free ends so that they dangle in front of you (probably touching the ground).
3
Reach around the outside of your legs with both hands and pull the free ends behind you through your legs. Pass each free end up through the portion of the rope wrapped around your waist. The free ends should now be between your body and your 'belt'.
Place the free ends over your shoulders so that the ends are dangling down in front of your chest, one on each side.
4
Pull down on these as you squat. This is an important step as this is what will tighten your harness. Stand up and squat several times while pulling on the free ends. You should feel it squeeze you between your legs – make sure key parts are not between the rope and your leg.
5
For both sides, maintaining tension on the free end, drop it behind your back and pass it behind the length of rope that cups your bum, from back to front. This binds the seat in place. Pull the free end towards your front, along your hips.
6
Connect the two ends together using a square knot off-centre to your body. Most right-handed people will place the square knot by their front left hip.
7
Make a half hitch with each free end as a keeper knot. Note that the half hitch must pass around both 'belts' of rope that now exist.
8
Place any excess rope out of the way in a deep left pocket (cargo pants are an asset) if you have one, and if your knot is on the left. Make sure that the rope is in a place that it won't interfere with your carabiner during a rappel.
9
Your harness is done. Now attach your carabiner and happy rappelling.


